プログラムでページ遷移+WebStorageをちょこっと
こんにちは。
Adobe Shadowが発表されましたね。
モバイル開発者には必須のツールになるのではないでしょうか。
私もインストールして使ってみましたが、端末毎のテストが、すごく楽になりそうです。
さて、前々回の続きです。
「開閉パネルとボタンが複数あって、押されたボタンの種類によって、開くパネルを変えたい、と言うケースへの応用」です。
前々回の話しは、プログラムから開閉パネルを展開する方法 をご覧下さい。
画面は、今回も2つです。
ボタンが2つあるindexページと、開閉パネルが2つあるhogeページです。
今回は、ボタンAをタップすると、hogeに遷移して、パネルAが開き、ボタンBをタップすると、同様にhogeに遷移して、パネルBが開く、と言う動きを実現します。
ポイントは、ボタンにidを振って、タップイベントを拾える様にすることと、ボタンのhref要素に、遷移先idを書かずに、#を書く、と言う所です。
<!DOCTYPE html>
<html>
<head>
    <meta charset="UTF-8">
    <title>Sample</title>
    <meta name="viewport" content="width=device-width, initial-scale=1">
    <meta name = "format-detection" content = "telephone=no">
    <link rel="stylesheet" href="http://code.jquery.com/mobile/1.0.1/jquery.mobile-1.0.1.min.css" />
    <script src="http://code.jquery.com/jquery-1.6.4.min.js"></script>
    <script src="http://code.jquery.com/mobile/1.0.1/jquery.mobile-1.0.1.min.js"></script>
    <script src="hoge2.js"></script>
</head>

<body>
    <div data-role="page" id="index" data-theme="b">
        <div data-role="header" data-theme="b">
            <h1><p>indexページのヘッダ</p></h1>
        </div>
        <div data-role="content">
            <a id="anchorA" href="#" data-role="button">I am button A. Tap me.</a>
            <a id="anchorB" href="#" data-role="button">I am button B. Tap me.</a>
        </div>
        <div data-role="footer" data-theme="b">
            <h1><p>indexページのフッタ</p></h1>
        </div>
    </div>

    <div data-role="page" id="hoge" data-theme="b">
        <div data-role="header" data-theme="b">
            <h1><p>hogeページのヘッダ</p></h1>
        </div>
        <div data-role="content">
            <div id="foo" data-role="collapsible" data-collapsed="true">
                <h1>私は開閉パネルAです</h1>
                    <p>
                      タップする度に、開いたり閉じたりします。
                    </p>
            </div>
            <div id="bar" data-role="collapsible" data-collapsed="true">
                <h1>私は開閉パネルBです</h1>
                    <p>
                      私もタップする度に、開いたり閉じたりします。
                    </p>
            </div>
        </div>
        <div data-role="footer" data-theme="b">
            <h1><p>hogeページのフッタ</p></h1>
        </div>
    </div>


</body>
</html>
$("#index").live("pageinit",function(){
    $("#anchorA").bind("tap", function() {  //#anchorAのtapイベントにbindする関数を定義。
        localStorage['to'] = '#foo';        //Webストレージに変数を保管します。
        $.mobile.changePage( "#hoge", {     //プログラムからページ遷移します。
            type: "post"
        });
    });
    $("#anchorB").bind("tap", function() { //#anchorBのtapイベントにbindする関数を定義。
        localStorage['to'] = '#bar';
        $.mobile.changePage( "#hoge", {
            type: "post"
        });
    });
});
$("#hoge").live("pageinit",function(){
    $(function() {
        $("div[data-role*='page']").live('pageshow', function(event, ui) {
            var prevId = ui.prevPage[0].id;
            if ( prevId != 'index' ) {
                return;
            }
            var to = localStorage['to'];    //Webストレージからプロパティ値を取り出します。
            if ( to == null ){
                return;
            }
            $(to).trigger("expand");
            $.mobile.silentScroll($(to).offset().top);  //おまけ。開いたパネルの位置までスクロールします。
        });
    });
});
changepageとWebStorageを使うと出来ますよ、と言う話でした。
では、また。
中の人Bでした。
画面下にある横スクロールするメニューの実装方法について
今回は、Androidアプリでよく見かける、画面下にある横スクロールするメニューの実装方法を、ご紹介します。
結論から言うと、画面レイアウトを定義するXMLファイルで横スクロールさせたいメニューのボタンを「HorizontalScrollView」タグで囲みます。
「ScrollView」が縦スクロールを行えるのに対し、「HorizontalScrollView」は横スクロールが行えます。
ただ、下のコードの様に複数のボタンを「HorizontalScrollView」で囲むと、実行時にエラーで強制終了となります。
<HorizontalScrollView
    android:layout_width="fill_parent"
    android:layout_height="wrap_content">

    <Button
        android:layout_width="wrap_content"
        android:layout_height="wrap_content"
        android:text="あいうえお" />

    <Button
        android:layout_width="wrap_content"
        android:layout_height="wrap_content"
        android:text="かきくけこ" />

    <Button
        android:layout_width="wrap_content"
        android:layout_height="wrap_content"
        android:text="さしすせそ" />

    <Button
        android:layout_width="wrap_content"
        android:layout_height="wrap_content"
        android:text="たちすてと" />

    <Button
        android:layout_width="wrap_content"
        android:layout_height="wrap_content"
        android:text="なにぬねの" />

    <Button
        android:layout_width="wrap_content"
        android:layout_height="wrap_content"
        android:text="はひふへほ" />

</HorizontalScrollView>
エラーの内容は「HorizontalScrollView can host only one direct child」です。
つまり、「HorizontalScrollViewは直接的には一人の子供しか面倒を見れません」と言われてしまいます。
なので、複数のボタンを「LinearLayout」で囲んでやればうまくいきます。
<HorizontalScrollView
    android:layout_width="fill_parent"
    android:layout_height="wrap_content">

    <LinearLayout
        android:layout_width="fill_parent"
        android:layout_height="wrap_content">

    <Button
        android:layout_width="wrap_content"
        android:layout_height="wrap_content"
        android:text="あいうえお" />

    <Button
        android:layout_width="wrap_content"
        android:layout_height="wrap_content"
        android:text="かきくけこ" />

    <Button
        android:layout_width="wrap_content"
        android:layout_height="wrap_content"
        android:text="さしすせそ" />

    <Button
        android:layout_width="wrap_content"
        android:layout_height="wrap_content"
        android:text="たちすてと" />

    <Button
        android:layout_width="wrap_content"
        android:layout_height="wrap_content"
        android:text="なにぬねの" />

    <Button
        android:layout_width="wrap_content"
        android:layout_height="wrap_content"
        android:text="はひふへほ" />

    </LinearLayout>

</HorizontalScrollView>
ここまでで、「横スクロールするメニュー」を作成することができました。
あとは、「画面下」に配置してやれば、「画面下にある横スクロールするメニュー」の完成です。
その方法は、画面レイアウトを定義するXMLのルートを「RelativeLayout」にし、
「HorizontalScrollView」に「android:layout_alignParentBottom="true"」を指定すれば実現できます。
<?xml version="1.0" encoding="utf-8"?>

<RelativeLayout  xmlns:android="http://schemas.android.com/apk/res/android"
        android:layout_width="fill_parent"
        android:layout_height="fill_parent"
        android:id="@+id/relTop" >

<LinearLayout
    	android:layout_below="@id/relTop"
        android:layout_width="fill_parent"
        android:layout_height="wrap_content"
        android:orientation="vertical" >

    <TextView android:layout_width="fill_parent"
        android:layout_height="wrap_content"
        android:text="本文" />

</LinearLayout>

<HorizontalScrollView
    android:layout_alignParentBottom="true"
    android:layout_width="fill_parent"
    android:layout_height="wrap_content">

    <LinearLayout
        android:layout_width="fill_parent"
        android:layout_height="wrap_content">

    <Button
        android:layout_width="wrap_content"
        android:layout_height="wrap_content"
        android:text="あいうえお" />

    <Button
        android:layout_width="wrap_content"
        android:layout_height="wrap_content"
        android:text="かきくけこ" />

    <Button
        android:layout_width="wrap_content"
        android:layout_height="wrap_content"
        android:text="さしすせそ" />

    <Button
        android:layout_width="wrap_content"
        android:layout_height="wrap_content"
        android:text="たちすてと" />

    <Button
        android:layout_width="wrap_content"
        android:layout_height="wrap_content"
        android:text="なにぬねの" />

    <Button
        android:layout_width="wrap_content"
        android:layout_height="wrap_content"
        android:text="はひふへほ" />

    </LinearLayout>

</HorizontalScrollView>

</RelativeLayout>
執筆者:中の人A
プログラムから開閉パネルを展開する方法
こんにちは。
中の人Bです。
jQueryMobile(以降、jQMと書きます)で便利に使えるコンポーネントの一つに、開閉パネルがあります。これを何かのイベントが発生したタイミング(例えば、ページが読み込まれたタイミング)で、開きたい、と言うことがあります。
これをやろうとして、本家のサイト(http://jquerymobile.com/demos/1.0.1/)や、翻訳サイト(http://dev.screw-axis.com/doc/jquery_mobile/)などを見たのですが、情報がなくて、困り果てたので、ここにその実装の方法を書こうと思います。
今回のサンプルでは、ページを2つ用意します。idをindexとhogeとします。
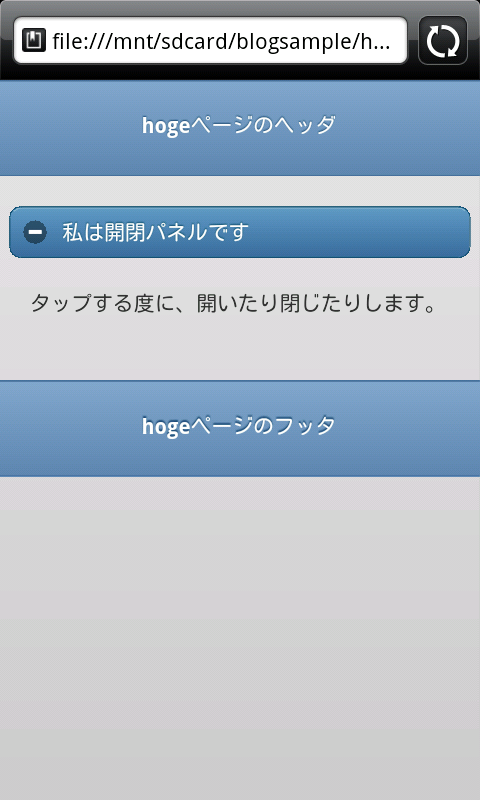
画面イメージはこんな感じです。普通にマークアップしただけだと、[Tap Me]ボタンをタップして、hogeページを開くだけのものです。
このマークアップは、こんな感じです。
<!DOCTYPE html>
<html>
<head>
    <meta charset="UTF-8">
    <title>Sample</title>
    <meta name="viewport" content="width=device-width, initial-scale=1">
    <meta name = "format-detection" content = "telephone=no">
    <link rel="stylesheet" href="http://code.jquery.com/mobile/1.0.1/jquery.mobile-1.0.1.min.css" />
    <script src="http://code.jquery.com/jquery-1.6.4.min.js"></script>
    <script src="http://code.jquery.com/mobile/1.0.1/jquery.mobile-1.0.1.min.js"></script>
    <script src="hoge.js"></script><!-- このファイルは、別途用意します-->
</head>

<body>
    <div data-role="page" id="index" data-theme="b">
        <div data-role="header" data-theme="b">
            <h1><p>indexページのヘッダ</p></h1>
        </div>
        <div data-role="content">
            <a href="#hoge" data-role="button">Tap me</a>
        </div>
        <div data-role="footer" data-theme="b">
            <h1><p>indexページのフッタ</p></h1>
        </div>
    </div>

    <div data-role="page" id="hoge" data-theme="b">
        <div data-role="header" data-theme="b">
            <h1><p>hogeページのヘッダ</p></h1>
        </div>
        <div data-role="content">
            <div id="foo" data-role="collapsible" data-collapsed="true">
                <h1>私は開閉パネルです</h1>
                    <p>
                      タップする度に、開いたり閉じたりします。
                    </p>
            </div>
        </div>
        <div data-role="footer" data-theme="b">
            <h1><p>hogeページのフッタ</p></h1>
        </div>
    </div>


</body>
</html>
hoge.jsにコードを書いて、hogeページが開いたタイミングで、展開パネルが自動的に開くようにします。ドキュメントを読んでも、プログラムから展開パネルの開閉を操作する記述はないのですが、jQMの実装モジュールを読むと、"expand"と言うイベントが定義されています。
実は、それさえ分かれば、何のことはなくて、数行のコードを書くだけです。
hoge.js
$("#hoge").live("pageinit",function(){
    $(function() {
        $("div[data-role*='page']").live('pageshow', function(event, ui) {
            $("#foo").trigger("expand");
        });
    });
});
実は、今回の例では、最初から開いとけば良いじゃん、と言う落ちになるのですが、この実装は、開閉パネルとボタンが複数あって、押されたボタンの種類によって、開くパネルを変えたい、と言うケースへの応用を想定しています。次回(正確には次々回)は、その辺りを書く予定です。
こう言う隠しイベント(隠してるわけじゃないと思いますが)みたいなのが他にも色々ありそうです。自分で見つける楽しみもあるんですけど、時間が無い時は焦ります。
興味の有る方は、http://jquerymobile.com/download/からzipファイルを落として、jquery.mobile-1.0.1.js(minの付いてない方)を読んでみて下さい。
1.0.1は、現時点でのものですので、その時の最新のものを読めば良いと思います。
それでは。
本日は、中の人Bが担当しました。
Androidの画面遷移時にIntentでDTOを受け渡す方法
Android開発でDTO(Data Transfer Object)をIntentで受け渡す方法についてご紹介します。
結論から言うと、DTOのクラスで「Serializableインタフェース」を実装することで可能になります。
また、「Serializableインタフェース」を実装したDTOをIntentに格納する時は、Intentクラスの「putExtra」メソッドを使用し、DTOをIntentから取得する時は、Intentクラスの「getSerializableExtra」メソッドを使用します。
「Serializableインタフェース」を実装していないDTOをIntentクラスの「putExtra」メソッドで格納しようとするとコンパイルエラーとなります。<コード上のポイント>
◆DTOクラス
public class SampleDto implements Serializable{

	//必要な変数

	//変数のgetter/setter
}
クラス名の後に「implements Serializable」を記述します。
◆遷移元画面のActivity
//DTOのインスタンス化
SampleDto sampleDto = new SampleDto();

//DTOに値を格納する
sampleDto.setZzz01(zzz01に格納する値);
sampleDto.setZzz02(zzz02に格納する値);
sampleDto.setZzz03(zzz03に格納する値);

//インテントのインスタンス化
Intent intent = new Intent(this, 遷移先Activity.class);

//DTOの格納
intent.putExtra("キーワード", sampleDto);

startActivity(intent);
Intentの「putExtra」メソッドでDTOを格納します。
◆遷移先画面のActivity
Intent intent = getIntent();
SampleDto sampleDto =
   (SampleDto)intent.getSerializableExtra("キーワード");
Intentの「getSerializableExtra」メソッドでDTOを取得します。その際、DTOのクラスにキャストしてやります。<サンプル実装>
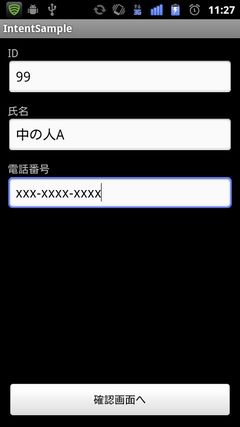
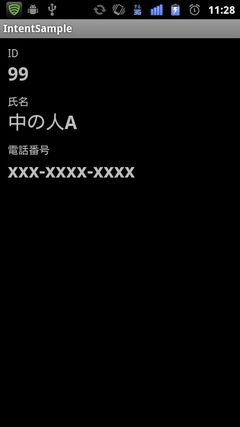
遷移元画面で「id」「氏名」「電話番号」を入力し、遷移先画面で入力内容を確認するアプリの実装例です。

◆MemberDto(DTOのクラス)
public class MemberDto implements Serializable{

	private int id;
	private String name;
	private String tel;

	public int getId() {
		return id;
	}
	public void setId(int id) {
		this.id = id;
	}
	public String getName() {
		return name;
	}
	public void setName(String name) {
		this.name = name;
	}
	public String getTel() {
		return tel;
	}
	public void setTel(String tel) {
		this.tel = tel;
	}
}
◆FirstActivity(遷移元画面のActivity)
public class FirstActivity extends Activity implements OnClickListener{

    private EditText id, name, tel;
    private Button btn;

    @Override
    public void onCreate(Bundle savedInstanceState) {

    	super.onCreate(savedInstanceState);
        setContentView(R.layout.first);

        id   = (EditText)findViewById(R.id.txt_id);
        name = (EditText)findViewById(R.id.txt_name);
        tel  = (EditText)findViewById(R.id.txt_tel);

        btn  = (Button)findViewById(R.id.btn);
        btn.setOnClickListener(this);
    }

    @Override
    public void onClick(View v) {

        //DTOのインスタンス化
        MemberDto memberDto = new MemberDto();

        //DTOに画面上の値を格納する
        memberDto.setId(Integer.parseInt(id.getText().toString()));
        memberDto.setName(name.getText().toString());
        memberDto.setTel(tel.getText().toString());

        //インテントのインスタンス化
        Intent intent = new Intent(this, SecondActivity.class);

        //DTOの格納
        intent.putExtra("MemberData", memberDto);

        startActivity(intent);
    }
}
◆SecondActivity(遷移先画面のActivity)
public class SecondActivity extends Activity {

    @Override
    public void onCreate(Bundle savedInstanceState) {

    	super.onCreate(savedInstanceState);
        setContentView(R.layout.second);

        Intent intent = getIntent();

        //DTOの取得
        MemberDto memberDto =
              (MemberDto)intent.getSerializableExtra("MemberData");

        //取得したDTOの値を画面に設定
        TextView id = (TextView)findViewById(R.id.lbl_id);
        id.setText(String.valueOf(memberDto.getId()));

        TextView name = (TextView)findViewById(R.id.lbl_name);
        name.setText(memberDto.getName());

        TextView tel = (TextView)findViewById(R.id.lbl_tel);
        tel.setText(memberDto.getTel());
    }
}
執筆者:中の人A


